

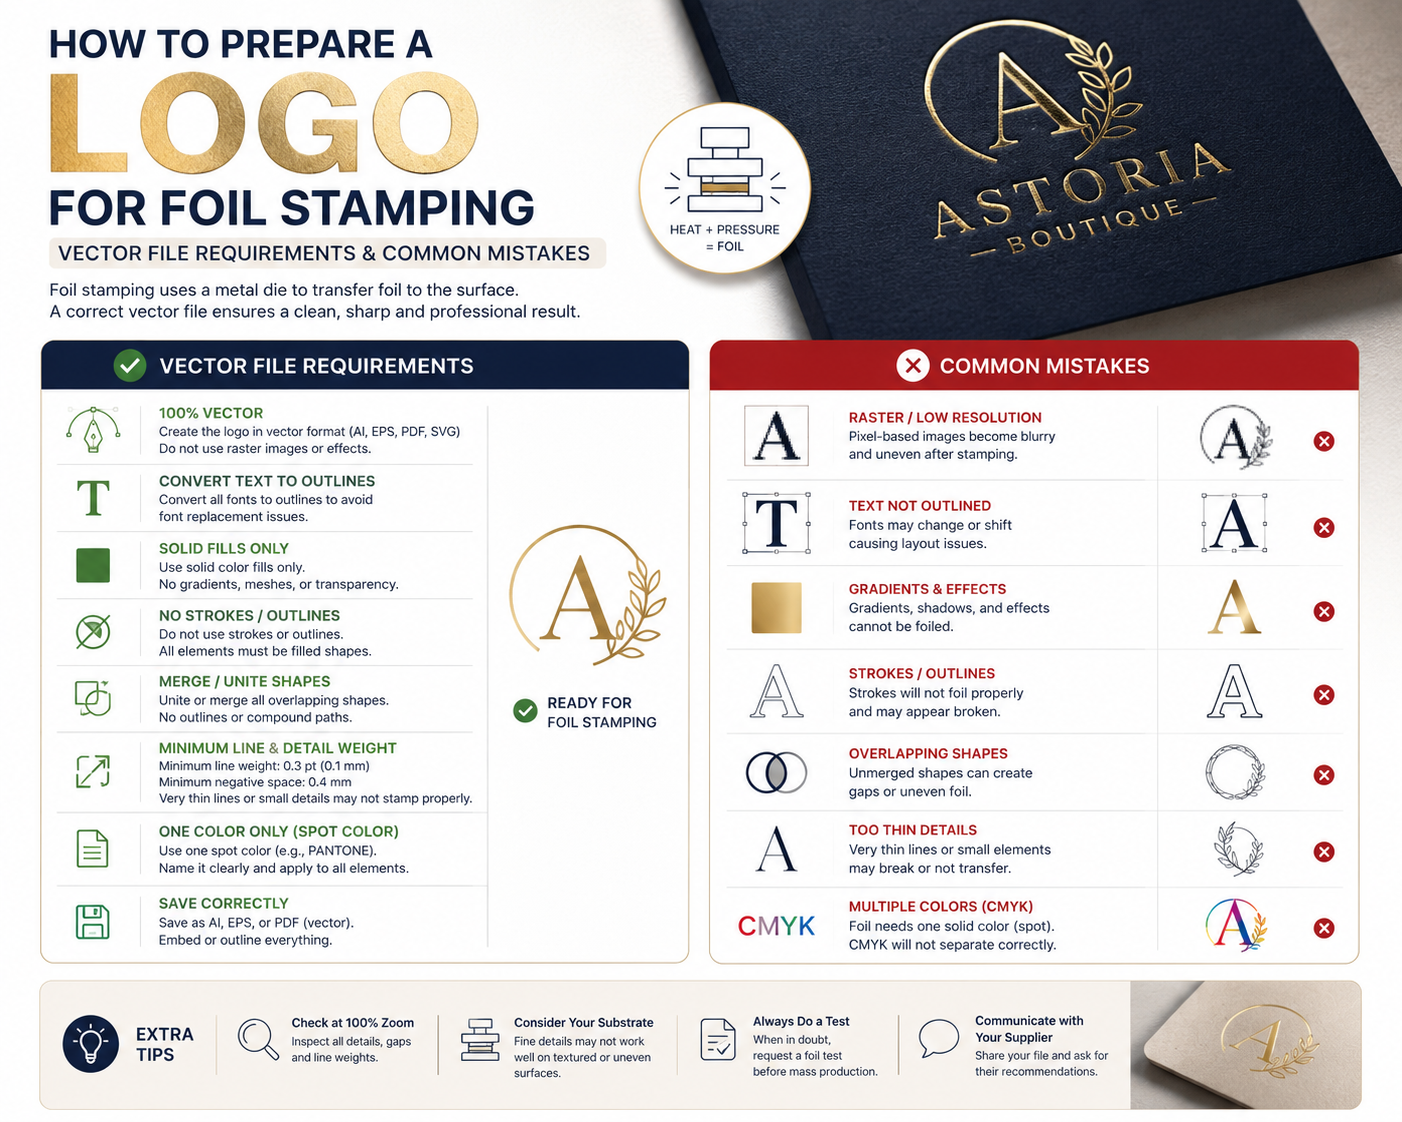
To prepare logo foil stamping vector file correctly is one of the most unforgiving tasks in professional print production — every problem in the file becomes a permanent problem in the physical die.
This means that every problem in your file becomes a permanent problem in the die. An open path produces an incomplete foil impression. A font that is not outlined causes a substitution error. A line below the minimum stroke width disappears entirely or creates a blurry, unusable foil edge. Understanding exactly what foil stamping requires before you prepare the file — not after the die comes back wrong — is the difference between a stunning premium result and an expensive mistake.
This guide covers every file requirement for foil stamping, the specific technical standards that differ between hot foil and cold foil, the most common mistakes that cause die failures, and how to get your logo file ready for foil production from any starting point.
How Foil Stamping Actually Works
How Foil Stamping Works — Why You Must Prepare Logo Foil Stamping Vector File Correctly
Hot foil stamping uses a brass or magnesium die — a plate with your logo design cut or chemically etched into it. The die is heated to a specific temperature and pressed against a roll of metallic foil film, transferring the foil from the carrier to the substrate wherever the die makes contact. The result is a permanent, crisp metallic impression — gold, silver, copper, holographic, or any other foil finish.
The die is made directly from your vector artwork. A laser or CNC machine cuts or etches the metal plate following the paths in your file with mathematical precision. Every path in the file becomes a cut or etch in the die. Every gap, every open path, every line below the minimum width either fails to cut correctly or produces an unusable die edge.
Cold foil stamping works differently — it applies adhesive in the shape of the logo using a standard printing plate, then laminates metallic foil onto the adhesive areas, then passes through a UV lamp to cure. Cold foil can produce finer detail than hot foil because it does not use heat and pressure. But it still requires clean vector paths because the adhesive plate is made from the same file.
Both processes require vector files for the same fundamental reason: mathematical precision. We require vector-based artwork, specifically in AI or EPS formats, to ensure the die-making equipment can interpret your design with mathematical accuracy. Raster images, even at high resolutions, lack the clean paths necessary for the physical stamping process.
The Two-File System — How Foil Stamping Files Are Structured
The two-file system is the foundation of how to prepare logo foil stamping vector file submissions for any professional shop.
File 1 — The foil die file. This file contains only the elements that will be foil stamped. It is prepared in 100% black (C:0 M:0 Y:0 K:100) on a white background — nothing else. No other colors. No backgrounds. No print elements. Just the clean vector shapes of the logo elements that will receive foil. This file is used to make the physical die.
File 2 — The print file. This file contains the rest of the design — everything that will be printed by standard printing processes (offset, digital, or screen). If the logo appears both in foil and as part of a larger printed design, the print file typically excludes the foil elements — the space where foil will land is either empty or indicated as a spot color layer.
File 3 (optional) — The composite mockup. A reference file showing both the print and foil combined in their correct positions. This is used for visual approval — the print shop uses it to verify registration, not for production. It is typically submitted as a PDF with the foil elements shown in a reference color (often gold or silver) so the client and the shop can confirm the intended design before any dies are made.
Foil elements should be on a separate layer, identified as a spot color labeled “FOIL.” This layer structure is the foundation of correct foil file preparation.
File Format Requirements
Only vector formats are accepted for foil stamping die files. Raster files — PNG, JPG, TIFF — are not accepted for die production under any circumstances. Lower resolution files will produce soft, blurry foil edges that compromise the professional appearance of your finished piece.
Accepted formats for the foil die file:
AI (Adobe Illustrator) — the preferred format for foil die files. AI gives the production team maximum editability, layer control, and path inspection capability. Vector-based AI files are strongly recommended for foil layers. AI submissions accelerate turnaround by 30% for foil projects compared to other formats.
EPS (Encapsulated PostScript) — universally accepted and supported by all professional prepress systems. EPS is the safe choice when the shop has not specified a format preference.
PDF (vector) — accepted by most shops when the PDF is generated from vector artwork. The critical requirement is that the PDF contains genuine vector paths, not embedded raster elements. A PDF generated from a PNG is still a raster file inside a PDF wrapper and will not be accepted.
Formats not accepted for foil die files: PNG, JPG, TIFF, GIF, PSD, BMP, or any other raster format. Files must be vector format.
The 100% Black Requirement
Every element in the foil die file must be specified as 100% black — specifically C:0 M:0 Y:0 K:100.
This is not aesthetic — it is technical. The die-making equipment reads the file as a high-contrast black-and-white image to determine where to cut or etch. Any element that is not 100% black — including rich black (which has CMYK values other than 0/0/0/100), Pantone colors, or any other color specification — may be interpreted incorrectly or cause unexpected die behavior.
All areas to be foil-stamped must be in solid black. No gradients or shades of gray. White areas represent unprinted spaces — areas where no foil will be applied.
The practical rule: in the foil die file, only two values exist. 100% black means “foil here.” White means “no foil here.” Nothing else belongs in the file.
Multiple foil colors require multiple separate files. If a design uses both gold and silver foil — which requires two separate dies — submit one 100% black file for each foil color, named clearly (logo-goldfoil.ai and logo-silverfoil.ai, for example). We will require a different file for each color of foil.
All Fonts Must Be Outlined
Text in the foil die file must be converted to outlines before submission. All text must be outlined — no fonts or editable text.
The reason is the same as in any production file: font availability. If the die-making equipment or prepress software does not have the same fonts installed, text will either not render at all or substitute with a different typeface. An outlined font is a fixed vector shape that renders identically on any system.
In Adobe Illustrator: Type → Create Outlines. Verify by attempting to click into the text with the Type tool — outlined text should not be selectable as text.
Always save an unoutlined version of the file before outlining. Outlined text cannot be converted back to editable type, and corrections after outlining require returning to the unoutlined source file.
For logos with distinctive or custom typography — which describes most quality brand marks — outlined text is not just a technical requirement. It is insurance against any possibility of the die being made with the wrong letterforms.
Minimum Stroke Widths and Detail Limits
Foil stamping has strict physical minimum dimensions that are different from — and in some cases more demanding than — standard printing or screen printing minimums.
Minimum line weight for standard foil stamping: 0.003 inches (0.8mm)
Lines, strokes, and design elements below this threshold cannot be stamped reliably. The die cannot be cut or etched to hold detail below this width, and the foil itself cannot transfer cleanly to elements that fine. Lines below the minimum either disappear from the finished piece or produce blurry, inconsistent foil edges.
Minimum reverse-out (knockout) width: 0.007 inches (0.178mm)
Reverse-out elements — spaces within the foil area where no foil is applied, such as the interior of letterforms in a reversed logo — have a different and more demanding minimum. The thinness of the area that has the absence of foil with foil stamped around it must meet this minimum.
This means that for a reversed logo — where the logo appears as a window in a foil-covered area — the gaps within the design (including the counters inside enclosed letters like O, A, P, and B) must be at least 0.178mm wide. Below this threshold, the gap fills in with foil because the die cannot maintain that level of detail under stamping pressure.
For cold foil: Cold foil can typically achieve finer detail than hot foil because it does not use the same mechanical pressure. But minimum dimensions still apply — confirm the specific minimums with the production shop for the cold foil process they use.
Gradients and Complex Effects Are Not Possible
Foil stamping is a binary process. Either foil is stamped in an area, or it is not. There is no middle ground — no gradients, no transparency, no halftone simulation of different foil densities.
The file requirement is simple in concept and strict in practice: the foiled area needs its own spot-color layer, with no gradients or photographic detail, since dies cannot reproduce either.
If a logo has a gradient that was designed for digital or print use, the foil stamping version must be adapted to solid shapes. A gradient in the original logo design needs to be simplified to a flat, solid foil shape — or the gradient element needs to be reproduced through a different technique (for example, using a standard printing layer for the gradient portion and foil only for the flat logo elements).
Similarly, any photography, illustration with gradients, or complex tonal artwork cannot be directly reproduced as foil stamping. Foil stamping is best suited for logos, wordmarks, borders, line art, and solid geometric shapes — clean, flat design elements with hard edges.
Registration and Design Considerations
Foil stamping is a separate finishing step performed after the base print run. The two processes — printing and foil stamping — are not performed in the same pass, which means the registration between the printed elements and the foil elements is not mechanically tied together. Registration can vary by ±2mm.
This 2mm tolerance has important design implications for logos that combine foil stamping with printed elements on the same piece.
Design with 2mm clearance. Foil elements that are intended to align precisely with printed elements — such as a foil logo outline that should perfectly border a printed fill — need at least 2mm of clearance to account for the registration tolerance. A logo that requires foil and print to align within 0.5mm will consistently produce misregistered pieces.
Avoid very fine foil lines adjacent to print elements. The registration tolerance means that fine foil strokes that run very close to printed elements will sometimes overlap and sometimes gap, producing inconsistent results across the print run.
Consider digital foiling for tight registration requirements. Digital foil lamination — applied using the same pass as digital printing — achieves much tighter registration than traditional hot foil stamping. For designs that require foil and print elements to align closely, digital foiling may be a better process choice than traditional foil stamping.
Substrate Considerations That Affect File Preparation
The substrate — the surface the foil is being applied to — affects what level of detail is achievable and how you should prepare your file.
Coated paper (gloss or matte coated) — the most common and most suitable substrate for foil stamping. The smooth, sealed surface provides the best foundation for foil adhesion and the cleanest fine-detail reproduction.
Uncoated paper — foil stamps differently on uncoated stock because the surface is more absorbent and less smooth. Fine detail may not transfer as cleanly, and minimum line widths effectively increase on uncoated stock. For uncoated paper applications, add additional margin above the technical minimums for safety.
Textured paper — heavily textured stocks are the most challenging for foil stamping. The texture creates high and low points on the surface, and foil only adheres to the raised areas the die contacts. Fine detail logos on textured stock often produce incomplete or patchy foil coverage. Simple, bold logos work best on textured substrates.
Plastic and synthetics — some synthetic substrates accept foil stamping but require adhesion treatments and specific die temperatures. Confirm substrate compatibility with the specific shop before committing to foil on non-paper materials.
The Complete Foil Stamping File Preparation Checklist
Use this checklist before submitting any logo for foil stamping production:
Die file preparation:
- All artwork built from clean vector paths — no raster images
- All elements in 100% black (C:0 M:0 Y:0 K:100) only
- All text converted to outlines
- No gradients, transparency effects, or halftones
- All strokes at or above 0.8mm (0.003 inches) minimum
- All reverse-out spaces at or above 0.178mm (0.007 inches) minimum
- All paths closed — no open paths
- No overlapping or duplicate paths
- File contains only the foil elements — nothing else
- Named clearly with foil color if multiple foil colors are used
- Correct bleed included if foil extends to the edge
Registration and layout:
- Design includes 2mm clearance between foil and print elements requiring close alignment
- Composite mockup prepared showing foil and print combined for approval reference
- Print file and foil die file supplied separately
File formats:
- Die file saved as AI or EPS (preferred), or as a genuine vector PDF
- All files named clearly and organized
Getting Your Logo File Ready for Foil Stamping
The most common starting point for foil stamping orders is a logo that exists only as a PNG, JPG, or SVG used for web and digital purposes — a raster file or a screen-optimized vector that has not been prepared for production use.
For foil stamping, that starting point requires professional preparation before the file can go to a foil supplier. The logo needs to be manually redrawn as a clean vector with all paths closed, all text outlined, all strokes verified against the minimum widths, and a separate foil die layer prepared in 100% black.
This is exactly the preparation work that Vector Refinery provides. When you specify foil stamping as your intended use when placing an order, the team delivers a properly structured foil die file — all elements in 100% black, text outlined, strokes at or above minimum widths, clean closed paths — alongside the standard AI, EPS, SVG, and PDF file package for other production uses.
Packages start at $45 for standard business logos. A free assessment is available before any payment is required.
Get your logo print-ready in 24 hours
Upload your PNG, JPG, or screenshot. A free assessment with exact price and turnaround is included before you pay anything.
Frequently Asked Questions
What file format does a foil stamping shop need? The foil die file should be submitted as AI or EPS — the preferred formats for foil production because they guarantee genuine vector path data and give the production team maximum control. Vector PDF is also accepted by most shops. PNG, JPG, and raster files are not accepted for foil stamping.
Why does the foil die file need to be in 100% black? The die-making equipment reads the file as a high-contrast black-and-white image to determine where to cut or etch the die. 100% black means foil will be stamped in that area. White means no foil. Any other color specification may be interpreted incorrectly by the equipment.
Can I use a gradient or fade effect in my foil stamped logo? No. Foil stamping is a binary process — foil is either stamped in an area or it is not. Gradients, fades, and transparency cannot be reproduced through hot foil stamping. Elements with gradients must be simplified to flat, solid shapes for the foil die file. Cold foil combined with printed halftones can simulate the appearance of tonal foil work, but this requires a more complex file setup and production process.
What is the minimum line width for foil stamping? The industry standard minimum for positive foil elements is 0.003 inches (0.8mm). For reverse-out elements — gaps within a foil area where no foil is applied — the minimum is 0.007 inches (0.178mm). Lines below these minimums cannot be reliably stamped and may disappear or produce blurry edges.
Why do I need a separate file for the foil elements? The foil die file and the print file are used by completely different pieces of equipment in completely different processes. The die file is used to manufacture a physical metal plate. The print file is used to print the non-foil elements. Combining them in a single file creates confusion and potential production errors. Always submit them as separate files.
What happens if my file has open paths? Open paths — vector paths where the start and end points do not connect — produce incomplete cuts or etches in the die. The resulting impression is incomplete, producing foil that does not fully define the shape. Every path in the foil die file must be closed before submission.
Taking the time to properly prepare logo foil stamping vector file artwork before submission prevents die failures, expensive reprints, and delays that cannot be recovered once the die is made.
External Resources
- Linemark Foil Stamping 2026 Guide — strategic and technical guide (June 2026)
- Publishing Xpress Foil Stamping File Setup — step-by-step file preparation (July 2026)
- LuxePockets Foil File Requirements — complete file guidelines
- Corcoran Printing Foil File Guide — five-step preparation process
- Bedwick and Jones Specialty Printing Guide — resolution and file quality standards (December 2025)
Published by Vector Refinery — Professional Manual Logo Vectorization and Production File Preparation Service. Visit vectorrefinery.com to upload your logo and get a free assessment today.
