
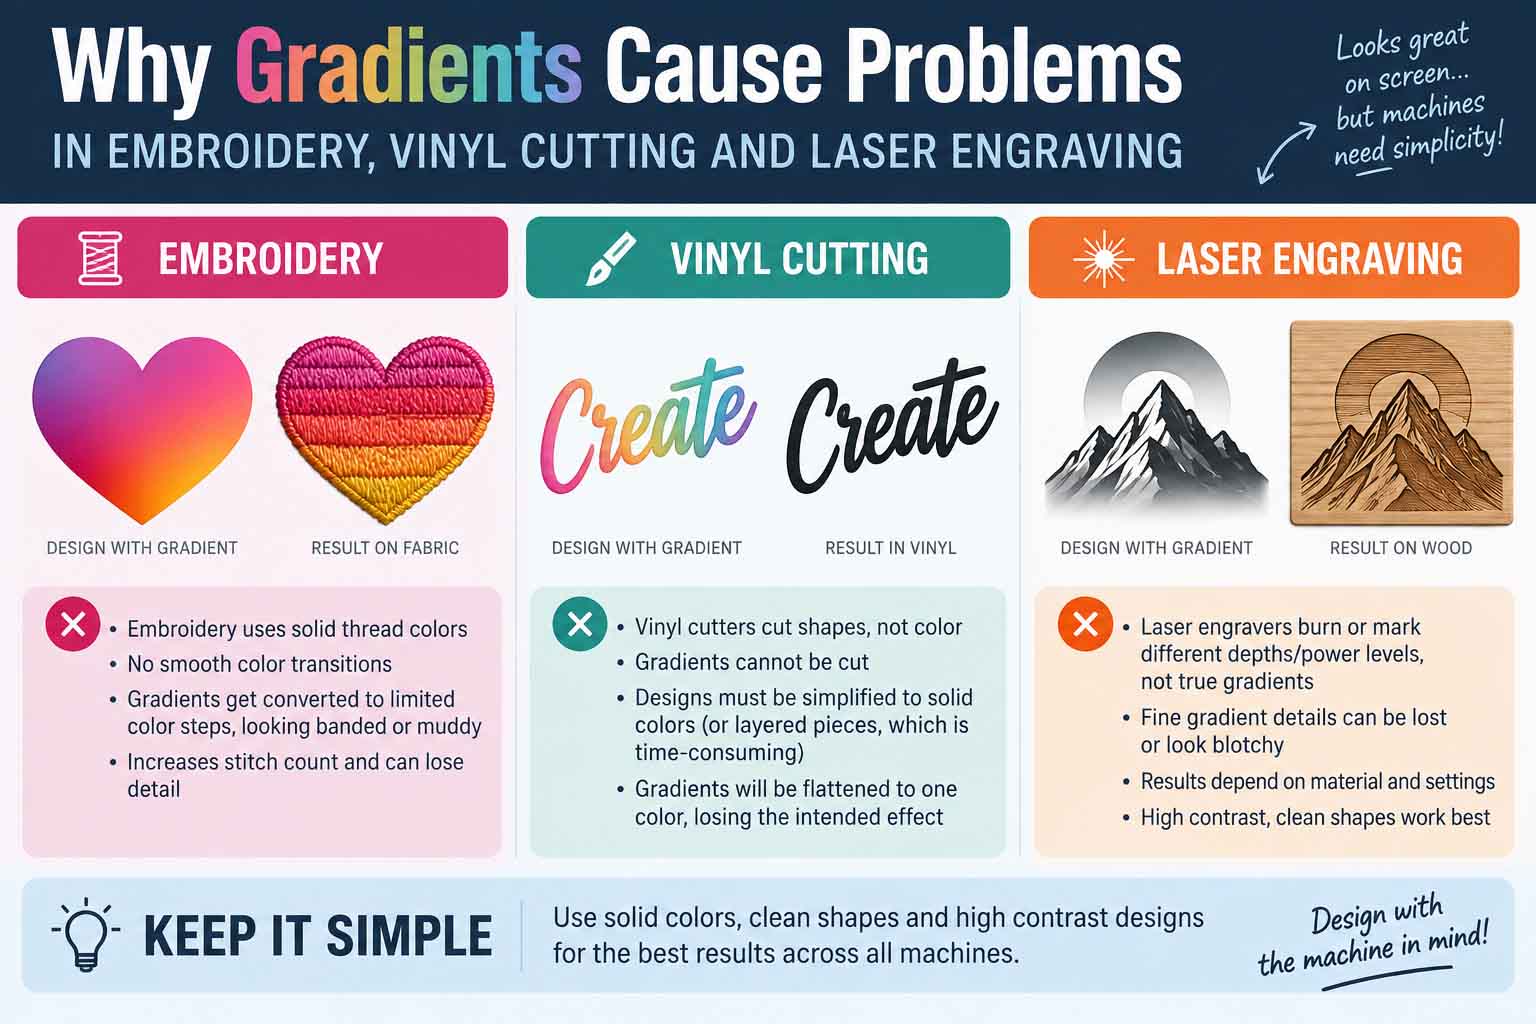
Gradients cause problems embroidery vinyl cutting laser engraving production every time — and in every case the root cause is the same physical limitation that no artwork software can overcome.
The frustrating part is that gradients look completely correct in the vector file and in every digital mockup. They render beautifully in Adobe Illustrator, in a browser, in a PDF proof. The problem is invisible until the file reaches the production equipment — and by then it is too late to avoid delays, rejected files, or finished products that look nothing like the design.
This guide explains exactly why gradients fail in each of these three production methods, what actually happens when gradient artwork goes to production, and how to convert gradient designs into artwork that each process can handle correctly.
What a Gradient Is and Why Production Equipment Cannot Follow It
What a Gradient Is and Why Gradients Cause Problems Embroidery Vinyl Cutting Laser Engraving
A gradient is a smooth, continuous transition between two or more colors. In digital design, a gradient is mathematically precise — the design software calculates every pixel or point along the transition and renders it as a smooth blend. On a screen, every individual pixel has its own independent color value, so a gradient from red to blue produces thousands of intermediate color steps, each rendered exactly.
Production equipment that removes material, stitches thread, or cuts vinyl cannot work this way. These processes are binary or limited in their color expression:
A vinyl cutter follows paths and cuts material. It cannot cut differently colored layers of a gradient — it can only cut where you tell it to cut and not cut where you do not.
An embroidery machine stitches thread. Thread comes in solid colors. There is no thread that transitions smoothly from one color to another. The machine cannot produce a smooth blend — only discrete color regions separated by defined boundaries.
A laser engraver can produce tonal gradients in some circumstances, but standard vector laser cutting follows paths — it cannot read gradient color values as operational instructions, and laser software maps colors to operations, not gradients.
Each of these limitations has specific consequences when gradient artwork reaches production. Understanding each one in detail explains what needs to change.
Gradients in Embroidery: Why Thread Cannot Blend
Gradients cause problems embroidery production because thread is a solid physical object — there is no blending mechanism available. Of the three production methods, embroidery has the most fundamental incompatibility with gradients.
Thread is a physical object. A standard embroidery thread measures 0.5mm to 0.8mm in diameter. Thread comes in specific solid colors — thread manufacturers like Madeira, Isacord, and Robison-Anton publish color ranges of several hundred to over a thousand individual colors, each a distinct solid shade. There is no thread that transitions from dark blue to light blue within a single strand. There is no mechanism to apply thread color at varying densities to simulate a blend.
When a gradient appears in embroidery artwork, there are three ways it can be handled — and none of them produce the smooth transition that was designed:
The digitizer selects one color and ignores the gradient. The digitizer picks a representative color from the gradient range — often the midpoint — and stitches the entire element in that single solid color. The gradient is simply not reproduced. The result is a flat color that represents the gradient only loosely.
The digitizer attempts color blocking. The digitizer divides the gradient into discrete color zones — perhaps three to five stops along the gradient range — and stitches each zone in the closest matching solid thread color. The result looks like a stepped approximation of the gradient, not a smooth blend. On a small garment logo at left-chest dimensions, the individual color zones may be too small to embroider cleanly, compressing the approximation further.
The digitizer uses blended needle technique. A technique called gradient embroidery or blended needle embroidery uses multiple thread colors alternating within a single stitching pass to create a visual blend effect. This technique requires a specialized machine and significant additional digitizing time. Even with this technique, the result is an approximation — a textured blend that reads as a gradient from a distance but reveals its thread structure up close.
None of these outcomes matches what the original gradient design showed. The fix is to adapt the artwork to embroidery’s capabilities before submission — not after.
The Fix for Embroidery
Convert gradients to flat, solid color fills before submitting artwork for embroidery. Identify the primary colors in the gradient and replace the gradient with discrete, clearly defined color regions that use solid thread-matchable colors.
For logos where a gradient is essential to the brand identity — a sunrise effect, a metallic sheen, a color fade that defines the visual — two approaches exist:
Simplify the gradient to flat color blocking. Choose two or three flat colors from the gradient range and design them as solid regions with defined boundaries. This produces a different visual than the original gradient but is actually embroiderable.
Create a separate embroidery version of the logo. Maintain the gradient version for digital and print use. Develop a flat-color embroidery version that represents the brand identity without the gradient. Most professional brand guidelines include an embroidery version specifically for this reason.
For more detail on embroidery color requirements, see the guide on why embroidery shops reject detailed logos.
Gradients in Vinyl Cutting: Why the Cutter Cannot Follow a Blend
Gradients cause problems vinyl cutting production for a different reason — the cutter reads paths, not colors, so gradient fills have nothing for the blade to follow.
Vinyl cutting is even more fundamentally incompatible with gradients than embroidery in one specific way: a vinyl cutter does not read color at all. It reads paths. The cutter blade follows vector path outlines to cut shapes from vinyl sheets. Color information in the file is irrelevant to the cutting process — what matters is where the paths are.
This means a gradient in a vinyl cutting file creates two separate problems:
Problem 1 — The gradient has no cut path. A gradient fills an area with color data but does not define a clean, hard edge between colors. The cutter needs paths to follow. If a design element is defined only by a gradient fill — a soft glow, a fade from colored to transparent, a blended background — there is no clean path for the cutter to follow. The element either does not cut at all, or the cutting software attempts to interpret the gradient as multiple overlapping shapes, producing unexpected and incorrect cut results.
Problem 2 — Multiple vinyl colors cannot blend. Cut vinyl is monochromatic per layer. A red vinyl layer is all red. A blue vinyl layer is all blue. A gradient that transitions from red to blue cannot be produced in vinyl because there is no such vinyl material — you would need every intermediate color as a separate vinyl layer, which is not practically achievable. The production method allows for multiple vinyl colors applied as separate layers with defined boundaries, not smooth transitions between them.
For laser cutting SVG files specifically: a proper SVG for laser cutting uses simple paths with hairline strokes for cuts, solid fills for engraving, and no external dependencies. An SVG designed for web display might use CSS gradients that laser software cannot interpret at all.
The Fix for Vinyl Cutting
Remove all gradients from vinyl cutting artwork and replace them with flat color fills with clean, defined boundaries. Each color must be a distinct solid fill that will be cut as a separate vinyl layer. The design cannot reference any color that transitions or blends.
For designs where the gradient was creating a glow, shadow, or dimensional effect: these visual techniques need to be rebuilt as flat design elements. A drop shadow that was a soft gaussian blur needs to become a hard-edged shape at a defined opacity. A radial glow needs to become a defined color field at the center fading to nothing — but “nothing” means transparent, which in vinyl terms means no vinyl at all, not a colored-to-clear blend.
Gradients in Laser Engraving: A More Complex Situation
Laser engraving has the most nuanced relationship with gradients of the three production methods — because unlike vinyl cutting and embroidery, laser engraving can produce tonal gradients in certain workflows. But the file requirements to do this correctly are specific, and the limitations are significant.
Vector laser cutting — gradients do not work
Gradients cause problems laser engraving production specifically in vector mode — color mapping systems cannot interpret gradient values as operation instructions. For vector laser cutting (where the laser follows path outlines to cut through material), gradients cause the same fundamental problem as in vinyl cutting. The laser follows paths, not color values. A gradient fill in a vector cutting file creates confusion in the laser software’s color-to-operation mapping system — and any element that the laser software cannot cleanly interpret may cut incorrectly, not at all, or cause errors.
For SVG files used in laser cutting: make sure your SVG uses simple, well-formed paths with no gradients, no embedded raster images, and no external CSS. This is a direct production requirement, not a preference.
Raster laser engraving — gradients can work, with conditions
Raster laser engraving moves the laser head back and forth across the surface like a printer, firing at varying power levels to produce different burn depths and intensities. This raster mode can reproduce tonal gradients — the varying laser power produces varying burn darkness, creating a visual gradient on the material.
However, producing a gradient through raster laser engraving requires a raster (pixel-based) file, not a vector file. A 300 DPI or higher grayscale PNG or JPG is the appropriate source format for photographic or tonal raster engraving. A vector gradient does not automatically translate to a correct raster engraving — the laser software must interpret the gradient correctly, and not all laser software handles this reliably.
For color mapping in laser software: raster images often have gradients around the edge of elements. A blue dot is actually comprised of several different shades of blue. If only the main blue shade from the center is mapped, the other shades around the edge default to the general settings, producing unexpected engraving behavior.
The practical rule for logos: for logo engraving where clean, sharp lines are the goal, use vector paths with no gradients. For photographic or artistic engraving where tonal variation is the intent, use a properly prepared raster file — not a vector gradient.
The Fix for Laser Engraving
For vector engraving (line engraving of logo paths): remove all gradients and replace with flat solid fills. Colors in the file are used to assign operations in the laser software (red = cut, blue = engrave, and so on). A gradient creates color mapping confusion that can cause elements to either default to wrong operations or produce errors.
For raster engraving (photo-style engraving): convert the gradient design to a properly prepared 300 DPI grayscale raster image. This is appropriate for photographic content, not for logo work. Run a test on scrap material before committing to a final piece — gradient reproduction varies significantly by material, laser power, speed, and dithering setting.
The Universal Problem: Auto-Traced Gradients in Vector Files
One of the most common gradient problems in production files does not come from intentional gradient design — it comes from auto-tracing raster images that contain anti-aliased edges or color blending.
When a PNG or JPG logo is auto-traced in Adobe Illustrator or any online vectorization tool, the auto-trace algorithm follows the pixel edges of the image. The soft, anti-aliased edges where one color meets another — or where a color meets a white background — get traced as dozens or hundreds of micro-color shapes, each a slightly different shade. The result in the vector file looks like a gradient effect because it is the vector approximation of anti-aliasing.
These micro-color regions are gradients in effect if not in name. Embroidery digitizers receive a file with dozens of color separations where there should be two or three. Vinyl cutting software sees overlapping shapes where clean cut paths should exist. Laser software maps a confusing color array where clean operation assignments are needed.
This is the hidden gradient problem in auto-traced artwork — and it is why auto-trace files consistently fail in production even when the original logo design contained no intentional gradients.
A professionally manually redrawn vector file has no auto-trace artifacts. Each color is a clean, flat fill with a hard boundary. There are no micro-color zones, no anti-aliasing artifacts, no gradient-by-approximation regions. The colors are exactly what they should be — matching the original design intent — and the file performs correctly in every production environment.
This is what Vector Refinery delivers with every manual redraw. When a logo is specified for embroidery, vinyl cutting, or laser engraving production, the colorist sets up flat, solid colors with clean boundaries. No gradients. No auto-trace artifacts. Files that production equipment can read and execute correctly.
Get your logo print-ready in 24 hours
Upload your PNG, JPG, or screenshot. A free assessment with exact price and turnaround is included before you pay anything.
Converting Gradient Designs to Production-Ready Artwork
For designers and brand managers who have gradient-heavy logo designs and need to adapt them for production use, the conversion process follows the same logic regardless of which production method is the target.
Step 1 — Identify all gradient elements. Open the file in Adobe Illustrator and review every element’s fill and stroke in the Appearance panel. Any fill or stroke that shows a gradient swatch rather than a solid color is a gradient that needs conversion.
Step 2 — Determine the production constraints. Embroidery, vinyl cutting, and vector laser engraving all require flat solid colors with defined boundaries. Know which production method the file is going to so you know exactly how many colors are acceptable and what the color separation requirements are.
Step 3 — Sample key colors from the gradient. Use the eyedropper tool to sample two to four representative colors from the gradient — typically the starting color, one or two midpoints, and the ending color. These become the flat color options for the converted design.
Step 4 — Rebuild gradient areas as flat color regions. Draw new shapes that divide the gradient area into the flat color regions identified in step 3. Each region gets one of the sampled solid colors. The boundaries between regions can be hard edges (appropriate for most production) or stepped shapes (producing a more intentional color-block aesthetic).
Step 5 — Verify no gradients remain. Use Edit → Find/Replace or the Select → Same → Fill Color function to confirm no gradient fills remain anywhere in the file. Every fill and stroke should be a solid flat color.
Step 6 — Test with the production constraint. For embroidery, reduce the file to the target garment size and verify all color regions are above minimum size thresholds. For vinyl cutting, check that all elements have clean cut paths. For laser engraving, verify all colors correspond to intended operations.
Quick Reference: Gradients in Each Production Method
| Production method | Can reproduce gradients? | What happens with gradients | The fix |
|---|---|---|---|
| Standard embroidery | No | Digitizer selects one color or creates approximate color blocks | Convert to flat solid colors |
| Vinyl cutting | No | Cutter ignores color — no paths to follow in gradient fills | Convert to flat fills with clean cut paths |
| Vector laser (line engraving) | No | Gradient colors confuse operation mapping — incorrect cuts or errors | Convert to flat fills with color-coded operations |
| Raster laser engraving | Partially | Grayscale gradients can reproduce tonally — requires raster file at 300 DPI | Use grayscale raster PNG, not vector gradient |
| Screen printing | No (standard) | No ink equivalent of smooth blend — appears as flat color approximation | Convert to flat spot colors |
Frequently Asked Questions
Why does my gradient logo look fine in Illustrator but fail in embroidery? Adobe Illustrator renders files on an RGB screen where every pixel is independently controlled — gradients display perfectly. Embroidery machines stitch thread, which comes in solid colors only. The rendering capability of design software is completely different from what a needle and thread can physically produce. What looks correct on screen is simply not achievable in thread without significant adaptation.
Can I embroider a gradient effect at all? A limited approximation is possible through gradient embroidery techniques — alternating multiple thread colors within a single stitching pass to create a visual blend effect. This requires a specialized machine, significant additional digitizing time, and produces an approximation rather than a true gradient. For most logo applications, converting to flat colors and accepting the different visual is the practical choice.
Why does my vinyl cutter ignore the gradient and just cut the entire shape? A vinyl cutter reads paths, not colors. If your gradient element has an outer path boundary, the cutter will cut along that boundary regardless of the gradient fill inside. The gradient color information is irrelevant to the cutter — only the path geometry matters. This is why gradient elements in vinyl files either cut as a single solid shape (if there is a bounding path) or cause errors (if the gradient is the only defining boundary).
Can I use gradients in laser engraving? For raster (photo-style) engraving, yes — with the right file setup. Convert the gradient area to a 300 DPI grayscale PNG and submit as a raster file for raster engraving mode. For vector line engraving of logos, no — convert gradients to flat solid fills with color-coded operations matching your laser software’s convention.
What is the fastest way to check if my vector file has gradient fills? In Adobe Illustrator: Edit → Find/Replace → under Object Type, select Fill with gradient. This selects all objects in the file that have gradient fills. Alternatively, open the Swatches panel — any gradient swatch that appears as a swatch being used by a file element indicates a gradient fill is present.
Does Vector Refinery remove gradients when vectorizing logos? Yes. Professional manual vectorization rebuilds the logo with flat, solid color fills — which is the correct structure for any production use. Auto-trace artifacts that create gradient-like micro-color regions are also eliminated during the manual rebuild process. When you specify embroidery, vinyl, or laser engraving as your intended use, the colors are set up specifically to meet that production method’s requirements.
Understanding why gradients cause problems embroidery vinyl cutting laser engraving is the first step to preparing artwork that actually works in production.
External Resources
- Printful Gradient Embroidery Guide — what is possible and how to prepare files for gradient embroidery effects
- SVGVector Laser Cutting SVG Guide — SVG file requirements for laser cutting including gradient handling (June 2026)
- PPLD Color Mapping for Laser Engraving — color mapping and gradient issues in laser software (July 2026)
- Adobe Illustrator Gradient Documentation — official reference for gradient types in Illustrator
Published by Vector Refinery — Professional Manual Logo Vectorization and Production File Preparation Service. Visit vectorrefinery.com to upload your logo and get a free assessment today.
