
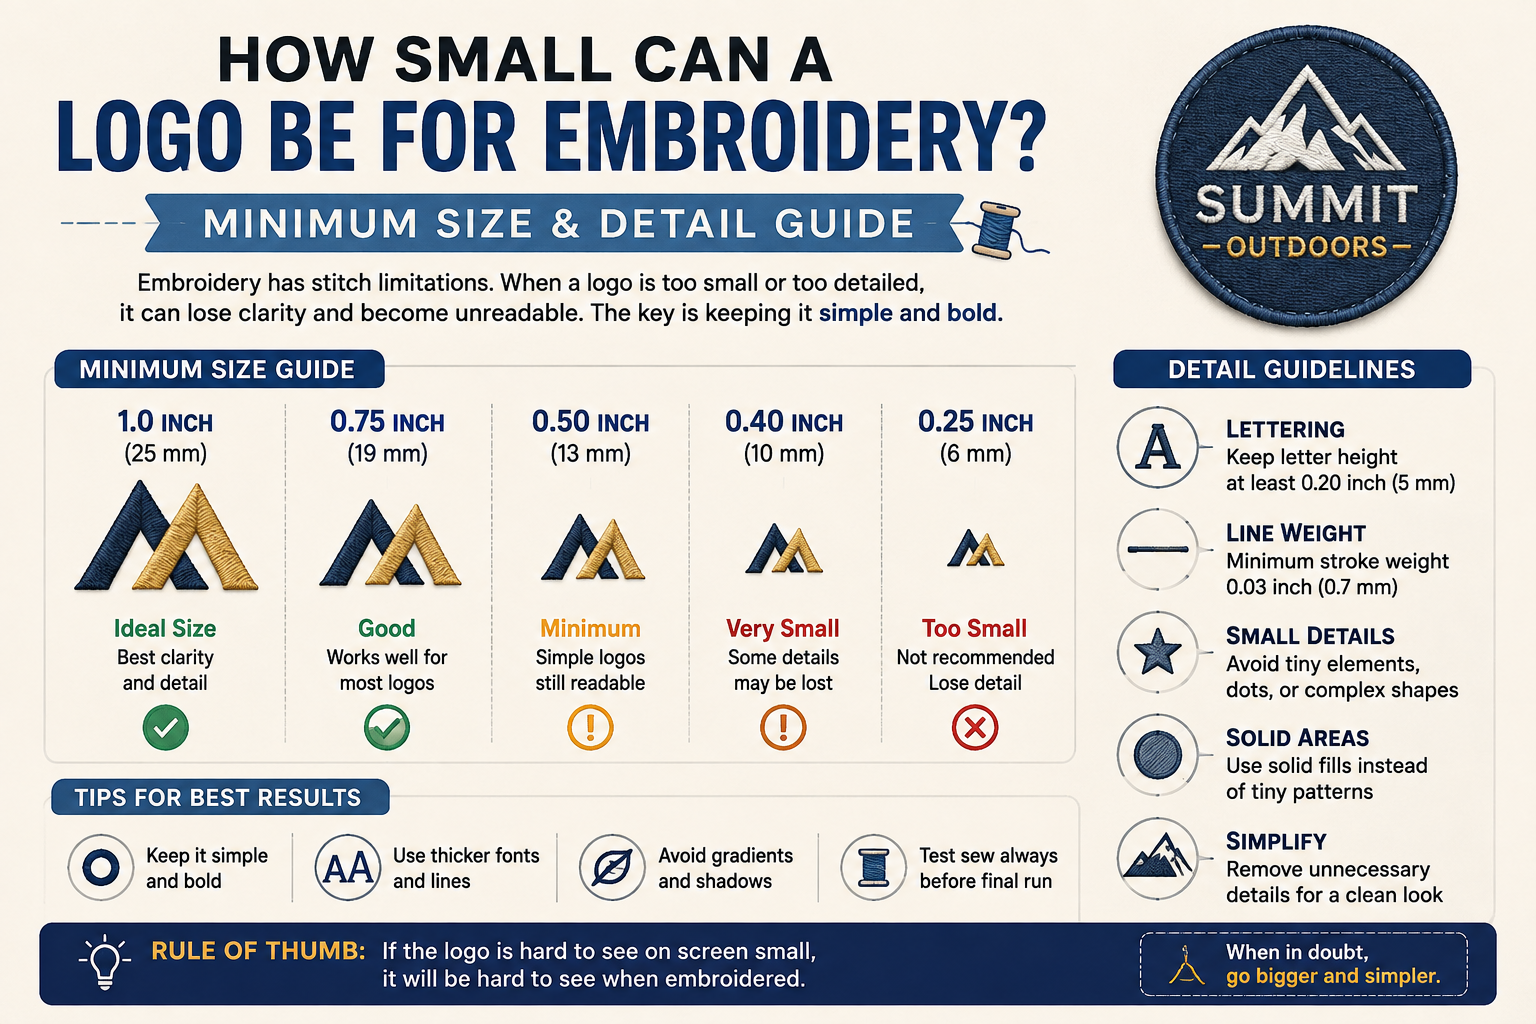
Minimum logo size embroidery is one of the most searched questions in custom apparel production — and the answer is more specific than most people expect. There is no single number. The minimum depends on where the logo goes, what the logo contains, what fabric it is going on, and whether the design has text, fine lines, or complex detail.
Get the size wrong in either direction and the result is a garment that looks unprofessional. Too small and details disappear, text becomes unreadable, and fine lines merge into blobs of thread. Too large and the logo overwhelms the garment and looks disproportionate.
This guide covers every placement with exact measurements, the detail limits that apply at each size, the specific elements that cause the most problems, and how to prepare your logo file so it survives the digitizing process and looks excellent on the finished garment.
Why Minimum Logo Size Embroidery Rules Exist
Before getting into the specific measurements, it helps to understand why embroidery has minimum size limits at all — because the limits are physical, not arbitrary.
Embroidery thread has a real diameter. A standard embroidery needle is approximately 0.3mm wide. Thread itself typically measures 0.5mm to 0.8mm in diameter. These are physical objects, not pixels. When a digitizer plans the stitch file for your logo, they are working with the constraints of real thread on real fabric. Elements that are smaller than what thread can physically reproduce either disappear into the fabric texture, merge with adjacent stitches, or produce uneven, inconsistent coverage.
This is why the “it looks fine on screen” explanation fails every time with embroidery. A screen renders at 72 or 96 pixels per inch and can display detail that no needle and thread can follow. The minimum size requirements are the floor below which the physics of embroidery do not work — and no digitizer, no matter how skilled, can override physics.
As one industry professional summarized it: [text below minimum] letterforms merge and fine detail collapses. Below those thresholds, text reads as texture rather than type from a normal viewing distance.
Left Chest Embroidery — The Standard Placement
Left chest is by far the most common embroidery placement on corporate apparel, uniforms, and branded garments. Getting the size right here is what most clients are asking about.
A left chest embroidered logo is usually 3 to 4 inches wide, and rarely more than about 4.5 inches. Height follows your logo’s shape, but most land in the 2 to 3 inch range. The goal is a logo that reads clearly up close without taking over the shirt. Text-heavy logos sometimes go a touch wider so the words stay legible.
For most polos, jackets, and corporate apparel, the standard left chest embroidery size is between 3.5 inches and 4.5 inches wide, depending on the garment type and logo shape. If the design is too large, it can look awkward and overpower the garment. If it is too small, details may disappear, and text can become unreadable.
Placement Position
The logo center sits about 7 to 9 inches down from the shoulder seam and roughly 4 inches in from the center placket, lining up around the height of the second button on a polo. On most adults that lands neatly in the open space above the chest pocket area.
Garment Size Adjustments
A 42-inch chest typically accommodates a 4-inch logo, while a 36-inch chest works better with 3 to 3.5 inches. Left chest embroidery typically measures 3 to 3.75 inches wide. Embroidered logos should be slightly smaller than printed equivalents because thread dimension makes designs appear larger.
This last point is worth emphasizing: embroidered logos appear larger than the same logo at the same size in print, because thread has physical dimension and creates a raised, textured surface that the eye reads as larger than it measures. When sizing an embroidered logo, the thread dimension effect means you can often go slightly smaller than you would for a printed equivalent.
Left Chest Minimum
The minimum logo size embroidery shops accept for left chest placement is approximately 2.5 inches wide for simple designs. The practical minimum for left chest embroidery on standard adult apparel is approximately 2.5 inches wide for simple logos. At this size, basic shapes and bold text are still readable, but fine detail, thin lines, and small text are not. For logos with detail, the minimum rises to 3 inches to ensure everything remains legible.
Cap Embroidery — The Most Constrained Placement
Cap embroidery is the most physically constrained placement. The structured fabric of the cap, the curved bill, and the limited flat area all restrict what can be embroidered cleanly.
Hat embroidery sizes vary by location, but the standard embroidery logo size for hats is around 1.75 inches for the front panel or 1 inch on the side.
The standard size for designs on hats typically ranges between 2.25 inches in height and 4.0 inches in width, or 57.2mm by 101.6mm in metric measurements, depending on the hat style and placement.
If width is more than 4 inches for caps, it will fall out of the cap size and cannot be embroidered, and size needs to be adjusted to fall into the specified range.
Cap Minimum Text Size
Cap embroidery has stricter text minimums than left chest because the curved, structured fabric creates additional registration challenges. The practical minimum for text on a cap is 0.3 inches (7.6mm) cap height — slightly higher than the standard apparel minimum. Text below this threshold on a cap will not stitch cleanly.
Cap Side and Back Placement
You can embroider on the front, the side, or the back of your cap, and the front of your beanie. Side cap embroidery is typically limited to 1 to 1.5 inches wide — small logos and monograms only. At this size, complex logos with multiple elements, fine lines, or small text are not embroiderable. Simple wordmarks and basic icons work well.
Sleeve Embroidery — Secondary Brand Placement
Sleeve embroidery is common for team sports, corporate uniforms, and secondary brand placement. The available area is smaller than left chest, which means tighter constraints.
Artwork on garment sleeves are usually smaller compared to designs placed on the left chest. A standard size for sleeve designs is around 2 to 3 inches in width. This size ensures that the logo is visible but not overly prominent. We recommend a maximum height of 2.1 inches and a maximum width of 3.5 inches.
Sleeve logos sit 1-2 inches below the shoulder seam and top out at 3.5 inches wide. Any logo with stroke width under 0.5 inches should be screen printed or DTG rather than embroidered.
The sleeve placement constraint is real: the curved sleeve, the seam proximity, and the limited flat area mean that fine-detail logos simply cannot be embroidered at sleeve dimensions. Keep sleeve logos simple — wordmarks, icons, or abbreviated versions of the primary logo.
Full Back Embroidery — Maximum Impact
Full back embroidery gives the most space and allows the most detail at the largest sizes.
The maximum size for back placement is 11.0 inches in height and 11.0 inches in width, or 279.4mm by 279.4mm in metric measurements. This option is great for showcasing creativity and individuality, and works well for teams or organizations.
Full back covers the entire back panel from 3-4 inches below the collar seam to 2-3 inches above the hem, at a maximum width of 12 inches on adult sizes. Full back is the highest-impact placement on a t-shirt and the most production-intensive.
At full back dimensions, logos that cannot work at left chest size — due to fine detail or complex elements — can often be embroidered successfully. The larger the design, the more detail the digitizer can incorporate while staying above the physical minimums for thread and needle.
The Hard Minimum: What Cannot Be Embroidered Regardless of Placement
Regardless of where the logo goes or how large the overall design is, specific elements have absolute minimums that apply everywhere.
Minimum Text Height
Letters cannot be embroidered less than 0.22 inches height (5 millimeters). If lettering is any smaller you will not be able to see it clearly.
The practical working minimum used by most professional embroidery shops is slightly higher. As described in the Northwest Custom Apparel technical guide, the minimum text height for legible embroidery is 0.25 inches (6.4mm) cap height. Below this, letterforms merge into illegible blobs. This is called “sewing shut” in the industry.
For cap embroidery specifically, the minimum rises to 0.3 inches (7.6mm) because the curved fabric adds registration difficulty.
Minimum Line Width
A minimum line width of 1mm (approximately 2.8pt or 0.04 inches) applies to any embroidered element. As documented in technical embroidery guidelines, thread has a real physical diameter of 0.5mm to 0.8mm, and lines below 1mm disappear into the fabric texture or merge with adjacent stitches.
Thin serif fonts — with their hairline contrast strokes — are particularly vulnerable. The thin strokes of a serif typeface at small sizes are below the embroidery minimum even when the overall letter height meets the threshold. Sans-serif fonts with consistent stroke weight embroider more reliably at borderline sizes.
Embroidery limits logo detail at small sizes. Any logo with stroke width under 0.5 inches should be screen printed or DTG rather than embroidered.
No Gradients
Gradients cannot be embroidered in standard production. Thread is a solid color — there is no way to blend thread smoothly from one color to another. Logos with gradients need to be redesigned with flat, solid color fills for embroidery production. For more detail on this, see the previous guide on why embroidery shops reject detailed logos.
Maximum Color Count
Standard embroidery production works efficiently with one to six thread colors. Each additional color requires an additional color change on the machine, adding cost and registration complexity. Logos with more than eight distinct colors are generally not practical for standard embroidery production at left chest dimensions.
The 3.5-Inch Test: A Practical Verification Method
This test is the fastest way to verify minimum logo size embroidery requirements before submitting any artwork for production.
Before submitting any logo for embroidery, apply this practical test:
Small details get lost in embroidery below 3 inches width. Thin lines, small text, and intricate elements need minimum sizing to maintain legibility through stitching.
Reduce your logo to 3.5 inches wide on your screen. At this size — the standard left chest dimension — anything that looks uncertain, unclear, or too fine will not embroider cleanly. Specifically check:
Text legibility. Can you read every word clearly? If any text is ambiguous at 3.5 inches on screen, it will not be readable as embroidery.
Line visibility. Are all lines clearly visible? If any line looks thin or uncertain at this size, it is likely below the 1mm minimum.
Detail clarity. Are all small icons, decorative elements, and fine details clear? If anything looks cluttered or indistinct, it needs to be simplified or removed.
Color count. Count the distinct colors. If there are more than six, consider consolidating before submission.
This test takes two minutes and catches the vast majority of embroidery size problems before the file reaches a digitizer.
What Happens When a Logo Is Too Small for Embroidery
Understanding the specific failure modes helps set expectations when a logo is close to the minimum threshold.
Text fills in. The counters — enclosed spaces inside letters like O, A, B, P, D — fill with thread as adjacent stitches press against each other. Text that was readable at design size becomes a solid mass of thread.
Fine lines disappear. Lines below 1mm either do not hold thread at all or merge with surrounding stitches. Thin decorative borders, fine crosshatching, and hairline details disappear entirely.
Colors merge. At very small sizes, closely spaced colors bleed into each other. The thread from one color area overlaps into adjacent areas, muddying the design.
Registration errors accumulate. Small logos require extremely precise needle positioning. At left chest dimensions with fine detail, even the slight movement of fabric under the needle foot can shift individual stitches enough to misregister fine elements.
When to Simplify Rather Than Resize
When a logo cannot be embroidered at the required size without losing essential elements, the right answer is often a simplified embroidery version rather than simply scaling up.
A simplified embroidery version preserves the essential brand identity while removing or enlarging elements that fall below production minimums. Typical simplifications include:
Remove fine detail. Thin decorative borders, fine crosshatching, small background patterns — remove these from the embroidery version.
Enlarge or remove small text. Taglines, web addresses, and small supporting text that fall below the text minimum should either be enlarged to meet the threshold or removed from the embroidery version.
Convert serif to sans-serif. If the brand uses a delicate serif typeface at borderline sizes, switching to a sans-serif version for embroidery preserves legibility while meeting the stroke width minimum.
Consolidate colors. Reduce to six or fewer colors by identifying which color distinctions are genuinely necessary for brand recognition and merging the rest.
The simplified version is a legitimate brand asset — most professional brand guidelines include an embroidery version alongside the print and digital versions specifically because embroidery requires different compromises than other production methods.
For more detail on when and how to create simplified embroidery versions, see the full guide on logo recreation service options.
File Preparation for Embroidery
The quality of the artwork file you submit to an embroidery digitizer directly affects the quality of the finished garment. A clean vector file gives the digitizer the best possible reference for stitch planning.
Final sizing depends on logo proportions, garment size, and embroidery detail. The typical placement for left chest embroidery requires careful attention to artwork quality.
A raster file — PNG, JPG, or screenshot — forces the digitizer to trace the artwork manually. The blurry edges, anti-aliased color transitions, and pixel artifacts in raster files make accurate stitch planning harder and the results less reliable.
A clean vector file — AI, EPS, or SVG with properly separated flat colors, minimum line weights above 1mm, and text at or above 6.4mm cap height — gives the digitizer everything they need to produce accurate, clean stitch work. The PNG to vector conversion guide covers this process in detail.
This is exactly what Vector Refinery provides. The Premium package includes specific embroidery optimization — path closure verification, minimum size review, gradient conversion to flat colors, and file structure optimized for clean digitizing. Every project is 100% manually redrawn — no auto-trace — producing files that meet every requirement embroidery digitizers specify.
Get your logo print-ready in 24 hours
Upload your PNG, JPG, or screenshot. A free assessment with exact price and turnaround is included before you pay anything.
Quick Reference: Embroidery Size Guide by Placement
| Placement | Standard width | Max width | Min text height |
|---|---|---|---|
| Left chest | 3–4 inches | 4.5 inches | 6.4mm (0.25 in) |
| Cap front | 2–3.5 inches | 4 inches | 7.6mm (0.3 in) |
| Cap side | 1–1.5 inches | 2 inches | 7.6mm (0.3 in) |
| Sleeve | 2–3 inches | 3.5 inches | 6.4mm (0.25 in) |
| Full back | 8–11 inches | 12 inches | 6.4mm (0.25 in) |
| Patch | 3–5 inches | varies | 6.4mm (0.25 in) |
Universal minimums regardless of placement:
- Minimum line width: 1mm (0.04 inches)
- Minimum text height: 6.4mm (0.25 inches) for apparel, 7.6mm (0.3 inches) for caps
- Maximum colors for standard production: 6
- No gradients in standard embroidery
Use this table as your minimum logo size embroidery reference for every common placement.
Frequently Asked Questions
What is the smallest a logo can be for left chest embroidery? The practical minimum for a left chest embroidered logo is approximately 2.5 inches wide for simple logos with bold text and minimal detail. For logos with multiple elements, fine lines, or small text, the minimum rises to 3 inches to ensure everything remains legible. Below 2.5 inches, most logos lose essential detail.
Can embroidery reproduce small text? Text below 0.25 inches (6.4mm) cap height cannot be embroidered reliably on standard apparel. Below this threshold, letterforms merge into illegible blobs as adjacent stitches fill the spaces within letters. For cap embroidery, the minimum rises to 0.3 inches (7.6mm).
Why does my logo look larger when embroidered than I expected? Embroidered designs appear larger than the equivalent printed size because thread has physical dimension and creates a raised, textured surface. This optical effect means embroidered logos look approximately 10-15% larger than a flat print of the same dimensions.
Can I embroider a logo with thin lines and fine detail? Only if the lines meet the 1mm minimum width and the overall design size is large enough to accommodate the detail. Fine decorative lines, thin borders, and intricate detail that work at print sizes typically need to be simplified or removed for embroidery. See the guide on why embroidery shops reject detailed logos for the complete breakdown.
What file format should I send for embroidery? Send a clean vector file — AI or EPS preferred — with flat Pantone colors, separated color layers, text outlined, and all elements at or above the minimum size thresholds. The embroidery shop’s digitizer converts this to the machine-specific stitch file. For more detail, see the complete guide on vector file formats.
How many colors can an embroidered logo have? Standard left chest embroidery works most efficiently with one to six thread colors. Above six colors, each additional color adds machine stops and cost. Above eight colors, the design may need to be redesigned for embroidery production.
Does the fabric type affect minimum size? Yes. Heavier, denser fabrics like thick fleece or structured cap material are less forgiving than lighter woven fabrics. On textured or pile fabrics, the effective minimum size increases because the texture competes with fine embroidered detail. On smooth, tightly woven fabrics, finer detail can be achieved closer to the technical minimums.
Understanding minimum logo size embroidery requirements before submitting saves digitizing fees, prevents rejections, and ensures the finished garment looks exactly as intended.
External Resources
For further technical reference on embroidery sizing and production standards:
- Thread Logic Embroidery Size Guide — comprehensive sizing reference for shirts and hats
- Digitizing Express Size Recommendations — placement-specific size tables
- Northwest Custom Apparel Technical Rules — production-focused guidelines from a shop with over 40 years of experience
- Embroidery Inc Left Chest Guide — 2026 size and placement reference
- The Standard Digitizing Size Guide — April 2026 left chest sizing guide
- FastEditor Line Thickness Guide — minimum line widths across all decoration methods
Published by Vector Refinery — Professional Manual Logo Vectorization and Embroidery File Preparation Service. Visit vectorrefinery.com to upload your logo and get a free embroidery-ready assessment today.
